Nativescript Labelで長い文字列の表示

Nativescroptで文字列を表示させるときはlabelを使うことが多いかと思いますが、
そのまま使うと文字列が最後の方で途切れてしまいます

HTMLのように右端まで行ったら、折り返しをさせるには以下のようにすることで実現できます

<ActionBar title="詳細" class="action-bar">
    <NavigationButton text="Go Back" android.systemIcon="ic_menu_back"
</ActionBar>
<FlexboxLayout flexDirection="column" class="page">
    <FlexboxLayout>
         <!-- 長い文字列を表紙させたいときは textWrap=trueにすると表示できる! -->
        <Label [text]="aff.content" textWrap="true"></Label>
    </FlexboxLayout>
</FlexboxLayout>

参考にした記事

Nativescript: Make label span width of its content, then wrap at a max width

Flask heroku でmysql + sqlalchemy テーブルが作れない

久々に超絶はまってしまいました

初めてpythonのフレームワークflaskをherokuにデプロイし終えたところなのですが、
2日ほどかかりました。。。。。

とりあえず解決策は以下の通りです

問題点は、データベース名の後のクエスチョンマーク以降を削除することです
それだけで問題を解決できます

# こっちは間違い
app.config['SQLALCHEMY_DATABASE_URI'] =  'mysql://your_username:your_password@host_name/database_name?reconnect=true'

# 以下の用に変更する! 
app.config['SQLALCHEMY_DATABASE_URI'] =  'mysql://your_username:your_password@host_name/database_name'

私自身クライアントサイドがメインで、デプロイに関わることが少なかったので大変勉強になりました。
あと、flaskは情報量が少ないのでちょっときついな〜とも感じましたけど、
typescriptには劣りますがストレスフリーに書けるのでやっぱり好きだなという印象です

ちなみにこちらエラー内容です。困っている人が見つけやすくなるように、SEO目的で載せさせてもらいます

Traceback (most recent call last):
  File "app.py", line 15, in <module>
    app.config['SQLALCHEMY_DATABASE_URI'] = os.environ['DATABASE_URL']
  File "/Users/Masahiro/.pyenv/versions/3.5.1/lib/python3.5/os.py", line 683, in __getitem__
    raise KeyError(key) from None
KeyError: 'DATABASE_URL'

後、mysql と組み合わせで pymysqlやmysqlclientなどのライブラリも調べまくって、
python3系に対応していないから問題が起きたのではないか?とも思いましたが、おそらく関係ないです

事実、僕自身がちょっとした修正で解決できたので。

今回はさすがに疲れました。・・・

参考にした記事
たくさんありすぎてどれかわからないです。すみません;;

devise token auth api をAngular4 でUIを実装する4

※angularの完成物のBitbucketのリンクです
Angular4-devise-token-auth

関連記事
devise token auth を使って簡単に早くAPIを作る1( api作成 )
devise token auth を使って簡単に早くAPIを作る2 ( jsonの出力 )
devise token auth api をAngular4 でUIを実装する1 ( angularのセットアップ )
devise token auth api をAngular4 でUIを実装する2
devise token auth api をAngular4 でUIを実装する3
devise token auth api をAngular4 でUIを実装する4 今回はここ

今回はログインした後にデータにアクセスできるようにしていきます

auth.service.tsを修正

ログイン機能を便利にするために修正を加える
ここでは、ログインに必要な

  • token
  • uid
  • client

情報をローカルストレージに保存できるようにします

import {Inject, Injectable, PLATFORM_ID} from '@angular/core';

// 必要なモジュールをインポート
import {Http, Headers, RequestOptions} from '@angular/http';
import 'rxjs/Rx'
import {isPlatformBrowser} from "@angular/common";


@Injectable()
export class AuthService {

  // apiのurl
  url = 'http://localhost:3000';

  constructor(@Inject(PLATFORM_ID) private platformId: Object, private http: Http) {
  }

  // token情報をローカルストレージに保存
  // 保存しておくことで、リクエストするたびに入力する手間を省く
  setToken(token: string) {
    if (isPlatformBrowser(this.platformId) && token) {
      localStorage.setItem('access-token', token);
    }
  }

  // uid = email 情報をローカルストレージに保存
  // 保存しておくことで、リクエストするたびに入力する手間を省く
  setUid(uid: string) {
    if (isPlatformBrowser(this.platformId) && uid) {
      localStorage.setItem('uid', uid);
    }
  }

  // client = 使用 端末情報をローカルストレージに保存
  // 保存しておくことで、リクエストするたびに入力する手間を省く
  setClient(client: string) {
    if (isPlatformBrowser(this.platformId) && client) {
      localStorage.setItem('client', client);
    }
  }

  // ローカルストレージに保存してあるtoken情報を取得する
  // 毎回入力することなく、tokenが有効な期間はこれで簡単にログインできる
  getToken() {
    if (isPlatformBrowser(this.platformId)) {
      return localStorage.getItem('access-token');
    } else {
      return null;
    }
  }

  // ローカルストレージに保存してあるuid情報を取得する
  getUid() {
    if (isPlatformBrowser(this.platformId) && localStorage.getItem('uid')) {
      return localStorage.getItem('uid');
    } else {
      return null;
    }
  }

  // ローカルストレージに保存してあるclient情報を取得する
  getClient() {
    if (isPlatformBrowser(this.platformId)) {
      return localStorage.getItem('client');
    } else {
      return null;
    }
  }

  // 新規登録のためのメソッド
  signUp(body: any): Promise<any> {
    let headers = new Headers({'Content-Type': 'application/json'});
    let options = new RequestOptions(({headers: headers}));
    return this.http.post(this.url + '/api/auth', body, options).toPromise();
  }

  // 引数にはログイン時に必要となる、emailとpasswordを入れる予定
  // headerはjsonだと明記する
  logIn(body: any): Promise<any> {
    let headers = new Headers({'Content-Type': 'application/json'});
    let options = new RequestOptions({headers: headers});
    return this.http.post(this.url + '/api/auth/sign_in', body, options).toPromise();

  }
}

新規登録のためのメソッドをhobby.service.tsに追加する

まずは、hobby serviceを生成します

$ ng g service hobby
Your global Angular CLI version (1.2.7) is greater than your local
version (1.0.3). The local Angular CLI version is used.

To disable this warning use "ng set --global warnings.versionMismatch=false".
installing service
  create src/app/hobby.service.spec.ts
  create src/app/hobby.service.ts
  WARNING Service is generated but not provided, it must be provided to be used

作成後はpostmanでのリクエストと同様に

  • token
  • uid
  • client

情報をheaderに付与してリクエストを行えるようにします

このheaderがTrueの場合のみ、jsonデータにアクセスできます

import {Injectable} from '@angular/core';
import {AuthService} from "./auth.service";

// 必要なモジュールをインポート
import {Http, Headers, RequestOptions} from '@angular/http';
import 'rxjs/Rx';
@Injectable()
export class HobbyService {

  url = 'http://localhost:3000';

  constructor(private http: Http, private authService: AuthService) {
  }


  findAll(): Promise<Hobby[]> {
    // header情報に token, uid, uidを付与する
    const headers = new Headers({
      'Content-Type': 'application/json',
      'access-token': this.authService.getToken(),
      'client': this.authService.getClient(),
      'uid': this.authService.getUid()
    });
    const options = new RequestOptions({headers: headers});
    return this.http.get(this.url + 'hobbies', options)
      .map(response => response.json())
      .map(data => {
        const entries: Hobby[] = [];
        data.forEach((data: any) => {
          entries.push(new Hobby(
            data['id'],
            data['name'],
            data['created_at'],
          ));
        });
        return entries;
      })
      .toPromise();
  }

}

// hobbyのオブジェクトを定義
export class Hobby {
  constructor(public id?: number,
              public name?: string,
              public created_at?: string) {
  }
}

hobby.service.tsをapp.module.tsに追加する

app.module.tsに追加しないと、そもそも認識されませんので追加します

import {BrowserModule} from '@angular/platform-browser';
import {NgModule} from '@angular/core';
import {FormsModule} from '@angular/forms';
import {HttpModule} from '@angular/http';

import {AppComponent} from './app.component';
// 追加
import {AuthService} from "./auth.service";
import {HobbyService}  from "./hobby.service";

import {LoginComponent} from './login/login.component';
import {SignUpComponent} from './sign-up/sign-up.component';

@NgModule({
  declarations: [
    AppComponent,
    LoginComponent,
    SignUpComponent
  ],
  imports: [
    BrowserModule,
    FormsModule,
    HttpModule
  ],
  providers: [
    AuthService, HobbyService
  ], //追加!
  bootstrap: [AppComponent]
})
export class AppModule {
}

ログインしていればhobbyの情報をgetできるようにする

まずは、ログインした情報ローカルストレージに保存できるよう修正します

import {Component, OnInit} from '@angular/core';

//AuthServiceとLoginクラスをインポート
import {AuthService, Login} from '../auth.service';

@Component({
  selector: 'app-login',
  templateUrl: './login.component.html',
  styleUrls: ['./login.component.css']
})
export class LoginComponent implements OnInit {

  // オブジェクトの初期化
  sign_in = new Login();

  constructor(private authService: AuthService) {
  }

  ngOnInit() {
  }

  data(): any {
    // ログイン時に必要なデータを作成
    let body = JSON.stringify({
      'email': this.sign_in.email,
      'password': this.sign_in.password
    });
    // auth serviceのloginメソッドを body を引数として呼び出す
    // その後responseをconsoleで表示
    this.authService.logIn(body).then((response: any) => {
      
      // header情報のtoken, uid, client情報をローカルストレージにセットする
      this.authService.setToken(response.headers.get('access-token'));
      this.authService.setClient(response.headers.get('client'));
      this.authService.setUid(response.headers.get('uid'));
      console.log(response);
    });
  }

}

app.component.tsを修正

ログイン情報は完成したので、次はapp.component.tsを修正して、hobbyのデータを取得します
データは初期化時に取得 + ロードボタンも設置し、追加した後にクリックすればリロードされるようにします

import {Component, OnInit} from '@angular/core';

import {HobbyService, Hobby} from "./hobby.service";
@Component({
  selector: 'app-root',
  templateUrl: './app.component.html',
  styleUrls: ['./app.component.css']
})
export class AppComponent implements OnInit {


  hobbies: Hobby[] = [];

  constructor(private hobbyService: HobbyService) {
  }

  // 初期化した時点でのデータを取得、表示させる
  ngOnInit() {
    this.hobbyService.findAll().then((hobbies) => {
      this.hobbies = hobbies;
      console.log(hobbies);
    }).catch((e) => console.log(e));
  }

  // データを追加した後にクリックすると、リロードできるボタン用のfunction
  getData() {
    this.ngOnInit();
  }
}
<div class="container-fluid">
  <div class="container">
    <app-login></app-login>
  </div>
  <div class="container">
    <app-sign-up></app-sign-up>
  </div>
  <div class="container">
    <button class="btn btn-primary" (click)="getData()">Hobby情報の取得</button>
    <div *ngFor="let h of hobbies">{{h.name}}</div>
  </div>
</div>

これで一通りの実装は完了です

最後のチェック

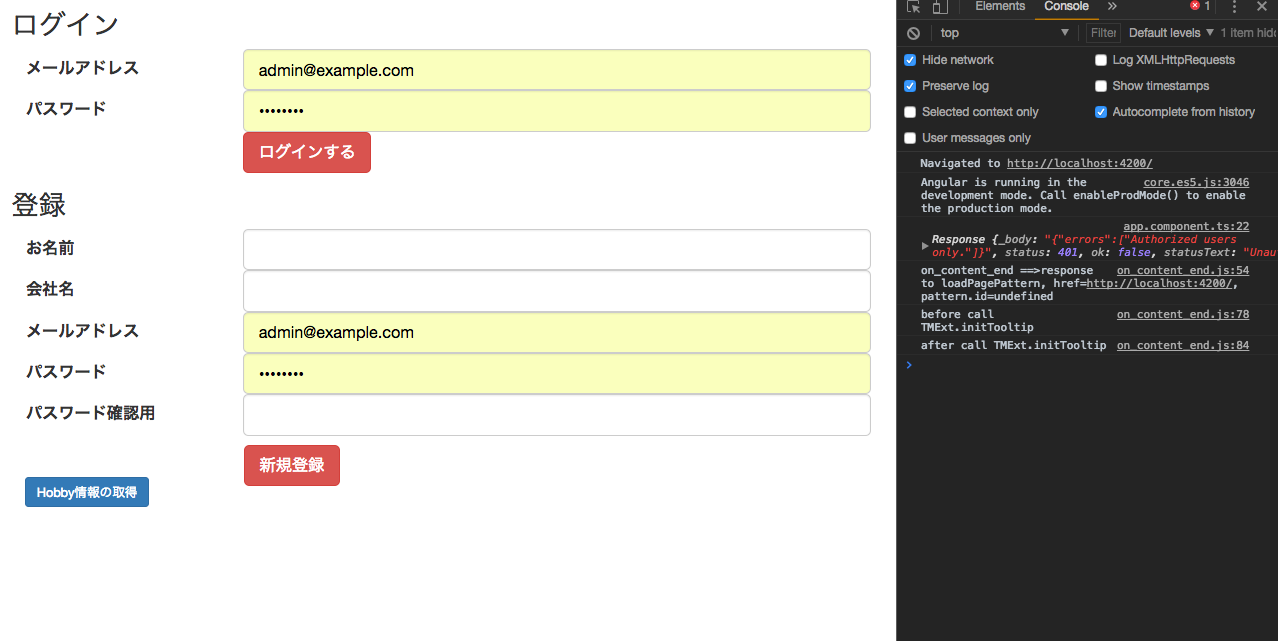
このチュートリアル通りに進めていけばこのような画面になり
401 のエラーステータスが帰ってきていると思います

次にログインしてみましょう

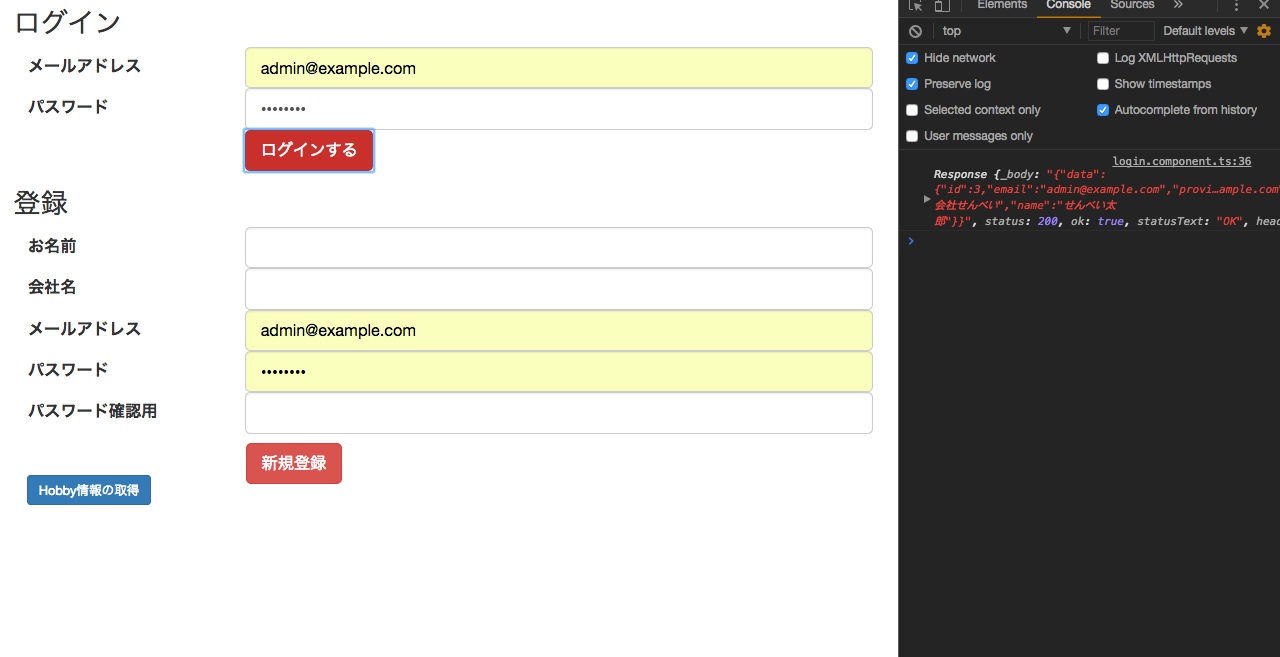
ログインができていたら、response情報が帰ってきます
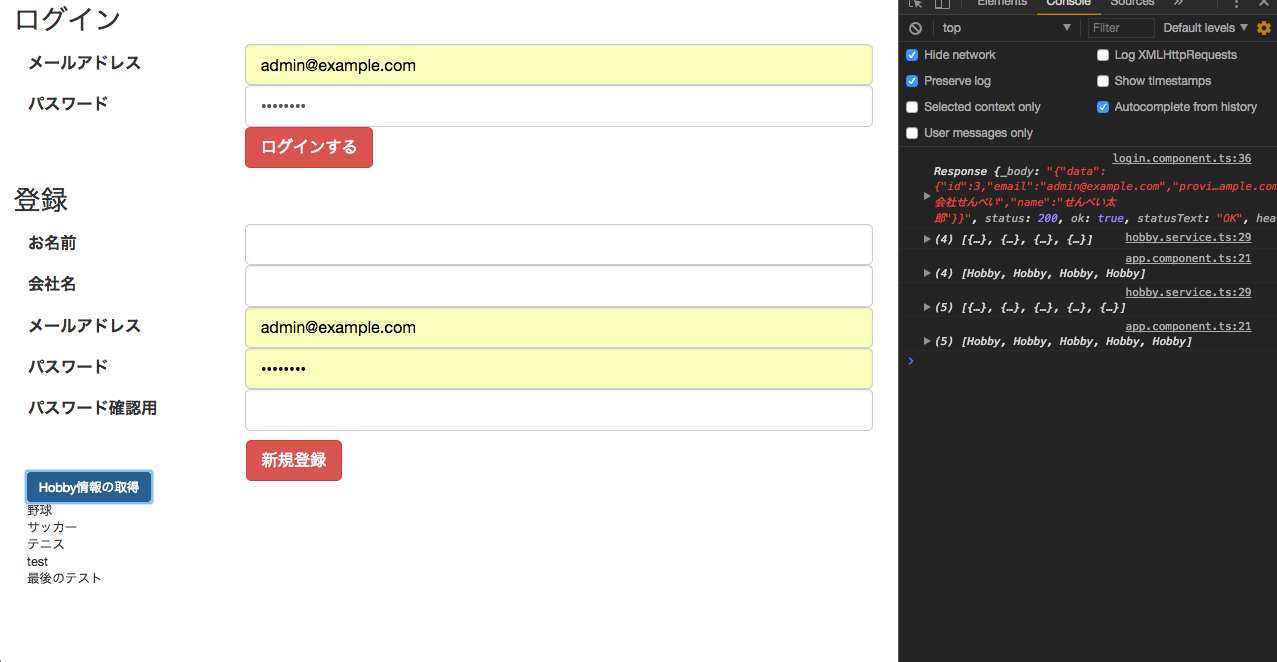
無事にログインができたらHobby情報の取得ボタンを押してみましょう

こんな感じのデータが帰ってきます

ちなみに、このようにデータベースに情報を入れた後に

Hobby情報の取得をクリックすると

ちゃんと情報を取得できています

最後に

進むに連れて駆け足気味になってしまい、すみませんでした。。
本当はedit , deleteなどの機能もやりたかったのですが、時間の都合上できそうもないのでここまでにできればと思います

このチュートリアルはtoken ベースのログイン制限 + JSON APIの作成がメインで基本的にはこの2つをある程度使いこなせれば
クライアントサイドとバックエンド、モバイルアプリなどをトータルで作れるようになります

かなり駆け足だったので、間違いや不明点などもあるかと思いますので、気になったことがあればコメントを残してもらえると修正できるのでありがたいです

devise token auth api をAngular4 でUIを実装する3

※angularの完成物のBitbucketのリンクです
Angular4-devise-token-auth

関連記事
全て連続しているので上から順に進めていっていただけるとわかりやすいと思います
devise token auth を使って簡単に早くAPIを作る1( api作成 )
devise token auth を使って簡単に早くAPIを作る2 ( jsonの出力 )
devise token auth api をAngular4 でUIを実装する1 ( angularのセットアップ )
devise token auth api をAngular4 でUIを実装する2
devise token auth api をAngular4 でUIを実装する3 ( 新規登録 ) 今回はここ
devise token auth api をAngular4 でUIを実装する4 ( ログインしやすくする)

今回は新規登録を追加します

[toc]

新規登録のためのメソッドをauth.service.tsに追加する

新規登録ができるように、auth.service.tsにメソッドを追加します
追加後はこんなコードになります

import {Injectable} from '@angular/core';

// 必要なモジュールをインポート
import {Http, Headers, RequestOptions} from '@angular/http';
import 'rxjs/Rx';

@Injectable()
export class AuthService {

  // apiのurl
  url = 'http://localhost:3000';

  constructor(private http: Http) {
  }


  // 新規登録のためのメソッド
  signUp(body: any): Promise<any> {
    let headers = new Headers({'Content-Type': 'application/json'});
    let options = new RequestOptions(({headers: headers}));
    return this.http.post(this.url + '/api/auth', body, options).toPromise();
  }

  // 引数にはログイン時に必要となる、emailとpasswordを入れる予定
  // headerはjsonだと明記する
  logIn(body: any): Promise<any> {
    let headers = new Headers({'Content-Type': 'application/json'});
    let options = new RequestOptions({headers: headers});
    return this.http.post(this.url + '/api/auth/sign_in', body, options).toPromise();

  }
}


// オブジェクト作成のためのクラス
// 新規登録用
export class SignUp {
  constructor(public name?: string,
              public company?: string,
              public email?: string,
              public password?: string) {
  }
}

// ログイン時のオブジェクトを定義
export class Login {
  constructor(public email?: string,
              public password?: string,
              public password_confirmation?: string) {
 } 
}

sign-up.component.tsを作成する

$ ng g component sign-up
installing component
  create src/app/sign-up/sign-up.component.css
  create src/app/sign-up/sign-up.component.html
  create src/app/sign-up/sign-up.component.spec.ts
  create src/app/sign-up/sign-up.component.ts
  update src/app/app.module.ts

作成後はコードを以下のように修正してください

import {Component, OnInit} from '@angular/core';
import {AuthService, SignUp} from '../auth.service';


@Component({
  selector: 'app-sign-up',
  templateUrl: './sign-up.component.html',
  styleUrls: ['./sign-up.component.css']
})
export class SignUpComponent implements OnInit {

  sign_up = new SignUp();

  constructor(private authService: AuthService) {
  }


  ngOnInit() {
  }

  data() {
    let body = JSON.stringify({
      'name': this.sign_up.name,
      'company': this.sign_up.company,
      'email': this.sign_up.email,
      'password': this.sign_up.password,
      'password_confirmation': this.sign_up.password_confirmation
    });
    this.authService.signUp(body).then((response) => {
      console.log(response);
    });
  }

}

viewの修正

componentが終わったので、次はhtmlを変更していきます

<form (ngSubmit)="onSubmit()" #signUpForm="ngForm">


  <div class="row">
    <h2>登録</h2>
    <div class="col-md-3 input-lg">
      <label>お名前</label>
    </div>
    <div class="col-md-9">
      <input type="text" class="form-control input-lg" [(ngModel)]="sign_up.name" name="name">
    </div>
  </div>


  <div class="row">
    <div class="col-md-3 input-lg">
      <label>会社名</label>
    </div>
    <div class="col-md-9">
      <input type="text" class="form-control input-lg"
             [(ngModel)]="sign_up.company" name="company">
    </div>
  </div>


  <div class="row">
    <div class="col-md-3 input-lg">
      <label>メールアドレス</label>
    </div>
    <div class="col-md-9">
      <input type="text"
             class="form-control input-lg"
             [(ngModel)]="sign_up.email"
             name="email">
    </div>
  </div>


  <div class="row">
    <div class="col-md-3 input-lg">
      <label>パスワード</label>
    </div>
    <div class="col-md-9">
      <input type="password" class="form-control input-lg"
             [(ngModel)]="sign_up.password" name="password">
    </div>
  </div>


  <div class="row">
    <div class="col-md-3 input-lg">
      <label>パスワード確認用</label>
    </div>
    <div class="col-md-9">
      <input type="password" class="form-control input-lg" [(ngModel)]="sign_up.password_confirmation"
             name="password_confirmation">
    </div>
  </div>


  <div class="row contact-item">
    <div class="col-md-offset-3 col-md-9 input-lg">
      <button type="submit" class="btn btn-danger btn-lg" (click)="data()">新規登録</button>
    </div>
  </div>
</form>

app.component.htmlにセレクタを入れる

最後にセレクターを入れてやります
こうすることでAngularがsign-up.componentをここに呼び出すことができます

<div class="container-fluid">
  <div class="container">
    <app-login></app-login>
  </div>
  <div class="container">
    <app-sign-up></app-sign-up>
  </div>
</div>

登録してみる

いくつかエラーが出ていますが、無事に登録できて successしたと返ってきています!

flask-mail ConnectionRefusedError: [Errno 111] Connection refused

flaskで確認メールを送れるようにしようと思ってflask mailを入れて見ましたー

ただ、簡単にできるはずなのに、ConnectionRefusedError: [Errno 111] Connection refused というわけがわからないエラーのせいで2時間弱使ってしまいました。。。

原因はこちら

# app.config['Mail_SENDER'] となっており、エラーが発生していました。。
app.config['MAIL_SERVER'] = 'smtp.gmail.com'
app.config['MAIL_USERNAME'] = 'test@gmail.com'
app.config['MAIL_PASSWORD'] = 'test'
app.config['MAIL_PORT'] = '465'
app.config['MAIL_USE_SSL'] = True
app.config['MAIL_USE_TLS'] = False

mail = Mail(app)

大文字にすべきところを小文字にしていたのが問題だったようなので、みなさん、しょうもないミスには気をつけましょう。。。

参考にした記事

Using Flask-Mail to send Email through Gmail- socket.gaierr
Configure Flask-Mail to use GMail

Nativescript おすすめチュートリアル

最近はよくNativescriptを使うので、役に立ったやつだったりオススメのチュートリアルをシェアします

[toc]

NativeScript-VideoPlayer Plugin

youtubeや動画を再生するための nativescript-videoplayerというプラグインの紹介をしてます

S3に入れてある動画を持ってくるのもいいかもしれませんね
ちなみにこちらのチュートリアルはAngularではなく生のjavascriptなので
nativescript-videoplayer こちらもみとくといいかもしれません

Create Horizontal Scrolling Lists in NativeScript Apps

こちらのチュートリアルは横にスクロールするスライダーを扱っています
スライダーはあると便利なので、コードをためといて使いたいときに使う的な感じですね

Tour Of Heroes As A NativeScript With Angular Android And iOS Application

Angular heros をNativescript版に落とし込んだものです
ある程度NativescriptやAngularをある程度触ったことがある方はもの物足りないと思いますが、初心者の方にはおすすめです!

Angularで innerHTMLするとCSSが効かない問題の対処法

AngularでinnerHTMLの中のイメージのサイズを修正しようとしてもできない問題が起こりました

この部分では効くのですが、やはりinnnerHTMLの中だと効かないっぽいです

 <div class="post-image">
      <img src="{{post?.post_image[0]?.image['url']}}">
 </div>
<div class="post format-gallery">
    <div class="post-content">
        <h1 class="post-title">{{post?.title}}</h1>
        <ul class="meta">
            <li class="categories" *ngFor="let tag of post?.tags">カテゴリー: <a
                routerLink="/blog/category/{{tag.name}}"> {{tag.name}}</a></li>
            <li>{{post?.created_at | date: 'yyyy-MM-dd'}}</li>
        </ul><!-- /.meta -->
        <div class="post-image">
            <img src="{{post?.post_image[0]?.image['url']}}"> 
        </div>
        <div class="body-image">
            <p [innerHTML]="post?.body"></p>
        </div>
    </div><!-- /.post-content -->
</div><!-- /.post -->

調べてみたところ以下のようにCSS記述すると問題なく使えるようにナルトのことで、実行したところ無事にサイズが修正されました!

:host /deep/ .post-content {
    img {
        text-align: center;
        width: 100%;
        height: auto;
        overflow: hidden;
        margin-bottom: 30px;
    }
}

.similar-image {
    img {
        width: auto;
        height: 200px;
        display: block;
        margin-left: auto;
        margin-right: auto;
    }
}

参考にした記事

Angular 2 – innerHTML styling

Active admin ckeditor導入後、delete できなくなった

管理画面はよくactive adminを使っているのですが、ckeditor導入後はなぜかdeleteできずにshowページへと遷移されてしまう、というわけがわからない状態が続いていました

早急に解決すべき問題ではなかったので、時間がある今朝直しました

問題だったのは active_admin.jsファイル内の以下のコード構成です
どうやら 

var CKEDITOR_BASEPATH = '/assets/ckeditor/';

で読み込まれるのが終わっているらしく、
順番を変更することで解決しましたー!

var CKEDITOR_BASEPATH = '/assets/ckeditor/';
//= require active_admin/base
//= require ckeditor/init

# 以下に変更
//= require active_admin/base
//= require ckeditor/init
var CKEDITOR_BASEPATH = '/assets/ckeditor/';

Nativescript tsconfig関連のエラー

色々いじってたらなんかエラーが出てきました

Found peer TypeScript 2.2.2
node_modules/@types/core-js/index.d.ts(327,13): error TS2300: Duplicate identifier 'log'.

node_modules/tns-core-modules/tns-core-modules.d.ts(110,18): error TS2300: Duplicate identifier 'log'.

TypeScript compiler failed with exit code 1

単純な解決策はtsconfigにtypes[]をcompilerOptionsに追加することで解決できます!

{
    "compilerOptions": {
        "target": "es6",
        "module": "commonjs",
        "moduleResolution": "node",
        "sourceMap": true,
        "emitDecoratorMetadata": true,
        "experimentalDecorators": true,
        "removeComments": false,
        "noImplicitAny": false,
        "types": []  // ここを追加!!!!!
    },
    "exclude": [
        "../node_modules"
    ]
}

参考にした記事
2.0 @types declarations compiled despite ignore listing in tsconfig #11257