
※angularの完成物のBitbucketのリンクです
Angular4-devise-token-auth
関連記事
全て連続しているので上から順に進めていっていただけるとわかりやすいと思います
devise token auth を使って簡単に早くAPIを作る1( api作成 )
devise token auth を使って簡単に早くAPIを作る2 ( jsonの出力 )
devise token auth api をAngular4 でUIを実装する1 ( angularのセットアップ )
devise token auth api をAngular4 でUIを実装する2 今回はここ
devise token auth api をAngular4 でUIを実装する3 ( 新規登録 )
devise token auth api をAngular4 でUIを実装する4 ( ログインしやすくする)
今回はログイン機能を構築することを目標に進めていきます
Angularの簡単な説明
Angularとはgoogleが主導で開発を進めているjavascriptのフレームワークです
最近ではvue.jsやreactと同じくらい流行っていると思いますが、これらとは異なり完全なフルスタックフレームワークです
個人的にはvueやreactの手軽さも好きなんですけど、ある程度の規模だったりtypescriptがデフォルトなので
コンパイルする際にエラーが出て来ることで早期にバグを防げる点ですごく利点があるなーと思ってます
ただ、小規模で利用する場合はオーバースペックになる可能性が高いので規模に合わせて使うのがいいかと
そんなAngularですが全体像はこちらです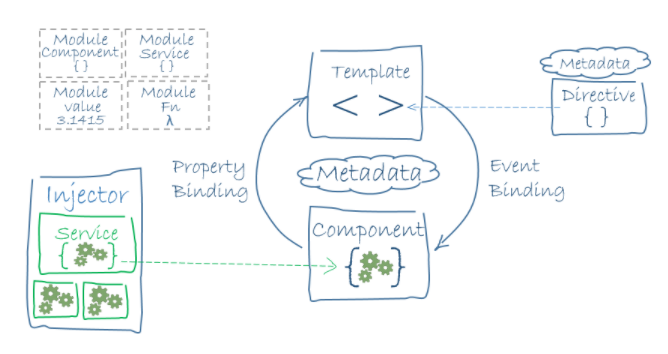
引用
Angularには大きく分けて
- Component
- service
があります
Componentはrailsで例えるとcontrollerで、Serviceはmodelです
基本的に使い方は同じでServiceに共通で使うロジックをまとめてComponentでそれらを呼び出し
エラーハンドリング等もここで行う感じです
ちなみにviewレンダリングもComponentでセットになっています
Serviceを作る
まずはserviceを作っていきます
ターミナルで
# appディレクトリに移動して
$ cd src/app/

# その後serviceを生成
$ ng g service auth
installing service
  create src/app/auth.service.spec.ts
  create src/app/auth.service.ts
  WARNING Service is generated but not provided, it must be provided to be used
ターミナルでng コマンドで生成すると以下のコードのように最低限必要な機能が備わっています
以下を編集してログインできるようしていきます
import { Injectable } from '@angular/core';

@Injectable()
export class AuthService {

  constructor() { }

}
編集後⬇︎
import {Injectable} from '@angular/core';

// 必要なモジュールをインポート
import {Http, Headers, RequestOptions} from '@angular/http';
import 'rxjs/Rx';

@Injectable()
export class AuthService {

  // apiのurl
  private url = 'http://localhost:3000';

  constructor(private http: Http) {
  }


  // 引数にはログイン時に必要となる、emailとpasswordを入れる予定
  // headerはjsonだと明記する
  logIn(body: any): Promise<any> {
    let headers = new Headers({'Content-Type': 'application/json'});
    let options = new RequestOptions({headers: headers});
    return this.http.post(this.url + '/auth/sign_in', body, options).toPromise();
  }
}


// ログイン時のオブジェクトを定義
export class Login {
  constructor(public email?: string,
              public password?: string) {
  }
}
app.module.tsの編集
componentをターミナルで生成すると、自動的にapp.module.tsに追加されますが、
serviceは追加されません
なので、追加します
import {BrowserModule} from '@angular/platform-browser';
import {NgModule} from '@angular/core';
import {FormsModule} from '@angular/forms';
import {HttpModule} from '@angular/http';

import {AppComponent} from './app.component';
// 追加
import {AuthService} from "./auth.service";

import {LoginComponent} from './login/login.component';
import {SignUpComponent} from './sign-up/sign-up.component';

@NgModule({
  declarations: [
    AppComponent,
    LoginComponent,
    SignUpComponent
  ],
  imports: [
    BrowserModule,
    FormsModule,
    HttpModule
  ],
  providers: [AuthService], //追加!
  bootstrap: [AppComponent]
})
export class AppModule {
}
Componentを作る
componentを生成する
$ ng g component login
installing component
  create src/app/login/login.component.css
  create src/app/login/login.component.html
  create src/app/login/login.component.spec.ts
  create src/app/login/login.component.ts
  update src/app/app.module.ts
こちらがデフォルトのコンポーネントです
import { Component, OnInit } from '@angular/core';

@Component({
  selector: 'app-login',
  templateUrl: './login.component.html',
  styleUrls: ['./login.component.css']
})
export class LoginComponent implements OnInit {

  constructor() { }

  ngOnInit() {
  }

}
それでは先程と同様に修正を加えていきます
import {Component, OnInit} from '@angular/core';

//AuthServiceとLoginクラスをインポート
import {AuthService, Login} from '../auth.service';

@Component({
  selector: 'app-login',
  templateUrl: './login.component.html',
  styleUrls: ['./login.component.css']
})
export class LoginComponent implements OnInit {

  // オブジェクトの初期化
  sign_in = new Login();

  constructor(private authService: AuthService) {
  }

  ngOnInit() {
  }

  data(): any {
    // ログイン時に必要なデータを作成
    let body = JSON.stringify({
      'email': this.sign_in.email,
      'password': this.sign_in.password
    });
    // auth serviceのloginメソッドを body を引数として呼び出す
    // その後responseをconsoleで表示
    this.authService.logIn(body).then((response: any) => {
      console.log(response);
    });
  }

}
componentの修正が終わったら次はviewサイドでbootstrapを使用することができるように
src/index.htmlにSDNを追加します
<!doctype html>
<html>
<head>
  <meta charset="utf-8">
  <title>Angular4DeviseTokenAuth</title>
  <base href="/">

  <meta name="viewport" content="width=device-width, initial-scale=1">
  <link rel="icon" type="image/x-icon" href="favicon.ico">
  <!-- bootstrap を使用できるようにsdnを追加 -->
  <link rel="stylesheet" href="//maxcdn.bootstrapcdn.com/bootstrap/3.3.2/css/bootstrap.min.css">
</head>
<body>
<app-root>Loading...</app-root>
</body>
</html>
Componentのviewを作成する
viewでは最低限のbootstrapを使うのでindex.htmlを編集
Componentを生成した際にhtmlを作られているので、フォームを修正します
<form>

  <div class="row">
    <h2>ログイン</h2>

    <div class="col-md-3 input-lg">
      <label>メールアドレス</label>
    </div>
    <div class="col-md-9">
      <input type="text" class="form-control input-lg" name="email" [(ngModel)]="sign_in.email">
    </div>
  </div>


  <div class="row">
    <div class="col-md-3 input-lg">
      <label>パスワード</label>
    </div>
    <div class="col-md-9">
      <input type="password" class="form-control input-lg" name="password" [(ngModel)]="sign_in.password">
    </div>
  </div>


  <div class="row">
    <div class="col-md-offset-3 col-md-9">
      <button type="submit" class="btn btn-danger btn-lg" (click)="data()">
        ログインする
      </button>
    </div>
  </div>
</form>
フォームを修正し終えたら、app.component.tsにlogin componentのセレクタを入れます
<div class="container-fluid">
  <div class="container">
    <app-login></app-login>
  </div>
</div>
これでログインは終わったので、実際にログインできるか試してみます
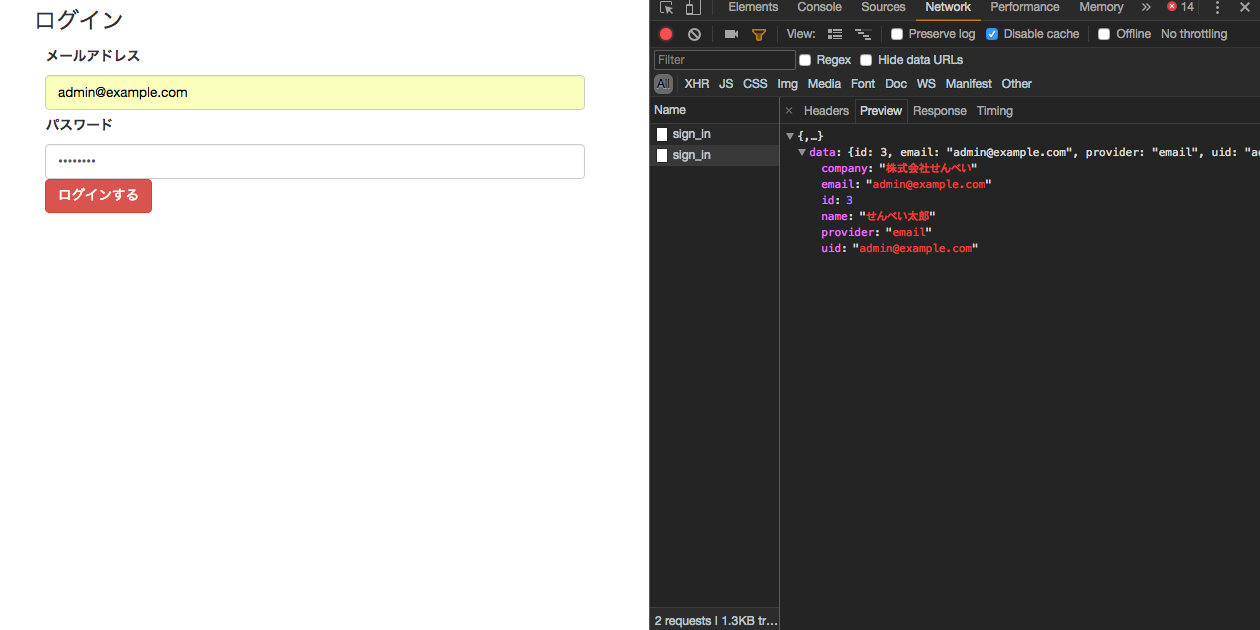
開発者環境を開いて、consoleもしくはnetoworkで確認してみましょう
データベースに登録されている情報が返却されていたら完璧です!
you&me へ返信する コメントをキャンセル